Kubernetes Dashboard – Run as Docker Image on Raspberry Pi 2.

The docker image has now been fixed for ARMv7 by the Google Kubernetes Dashboard team as of 19th January 2016.

Due to the change in the code, you can now build and run Dashboard in a Docker image, rather than having to serve it or use ‘Screen’ as per my previous blog post here.

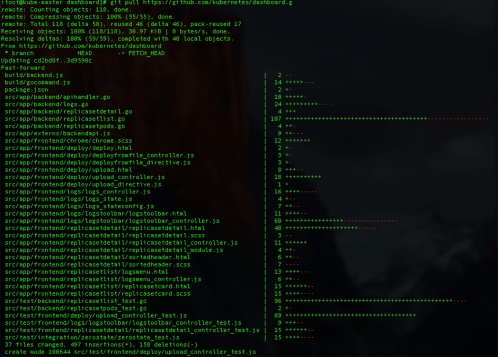
So first things first, we need to update our code base to the latest version of Kubernetes Dashboard from their Github by running the following command inside our Dashboard directory:

git pull https://github.com/kubernetes/dashboard.git

This then downloads and checks the latest files against the currently installed files and updates them accordingly, as shown in the below screenshot.

KubeDashUpdate

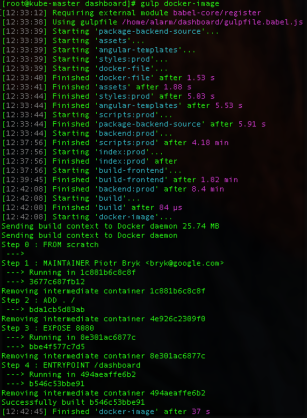
In order to build and run the Docker image, we need to do the following:

gulp docker-image

gulpDockerImage

You can then check that the Docker image has been built by running:

docker images

dockerImage

Finally, to run the Docker image, we use the following command:

docker run –d –p :9090:9090 kubernetes/dashboard –apiserver-host=http://192.168.1.201:8080

You will need to change the IP address of the Api server host to match your Master node, in our case our Master is on 192.168.1.201.

The dashboard should now be running in a tiny docker image, without the need for screen or an active running terminal.

You can check this with:

docker ps

dockerPS

Thank you to Piotr Bryk for updating the build code and fixing this issue!
Keep an eye on the Kubernetes github here for further updates as they seem to be coming in thick and fast and you can update your Dash at any time, using this method.

Kubernetes Dashboard on Raspberry Pi 2

Google are currently working on a Dashboard UI for their Kubernetes orchestration tool. This is still a work in progress and not yet ready for production, however, they aim to have a BETA release end of January and a stable release towards the end of February. We have managed to get this working, ready for the BETA release.
This will replace the current kube-ui.

What you will need (at least):
2 x SD cards loaded with Arch Linux ARM & Kubernetes. (Covered in our previous blog post here)
2 x Raspberry Pi 2 Model B

Preparation
In order to get the Dashboard working, there are a number of software dependencies that need to be installed and configured first.
• Docker 1.3+
• Go 1.5+
• NodeJS 4.2.2+
• NPM 1.3+
• Etcd 2.2+
• Java 7+
• Gulp 3.9+
• Python
• Python2
• Make
• Bower
• GCC

Preparation Installation
Docker should already be installed, and we will be leaving Go till last. I prefer doing this in steps as sometimes mirror connections fail, but there is a single command, shown below the steps.
1. Open a terminal on your Master Kubernetes Node.
2. Log into the root account using su and the root password.
3. Install Node JS and NPM.

pacman -S nodejs npm

4. Install Java 7.  When we were testing with the later versions of Java, we ran into issues with compiling the dashboard, therefore we stuck with JDK 7.

pacman -S jd7-openjdk

5. Install Gulp

pacman -S gulp

6. Install Python and Python 2

pacman -S python python2

7. Install Make

pacman -S make

8. Install Bower

pacman -S bower

9. Install GCC

pacman -S gcc

To install all the dependencies in one go, you can use the following command:

pacman –S nodejs npm jdk7-openjdk gulp python python2 make bower gcc

Now, we are going to build Go. At the time of writing, there is not a working version of Go 1.5 for ARMv7, therefore we have to firstly install the older 1.4.3 version from the public repository and then manually build 1.5 on an ARMv7 platform.

1. Clone the “Go” repository.

git clone https://go.googlesource.com/go

2. Change directory to “Go”.

cd go

3. Checkout “Go 1.4.3”.

git checkout go1.4.3

4. Change directory to “src”.

cd src

5. Run the bash script in order to build Go 1.4.3.

./all.bash

6. As Go is installed in our user’s home directory, in order to reference this, we need to add the command “Go” to the user’s $PATH.

nano /home/alarm/.bashrc

and input at the bottom of the file:

export GOROOT=$HOME/go

export PATH=$PATH:$GOROOT/bin

7. Log out and back in to the shell as user “alarm”, not “root”
8. Check that “Go” is installed the version correctly and the $PATH has been setup.

go version

This should display the following:
goVersion

9. To check that “Go” is now installed and working correctly, we created a simple “Hello, World” script:

nano helloWorld.go

and pasted this into the file:

package main

import “fmt”
func main() {
fmt.Printf(“hello, world\n”)
}

save and exit.

10. Run the file.

go run helloWorld.go

This should return the following:

helloWorld
If this is not displayed and you receive an error saying “Go not found”, go back and ensure that “Go” has been added to your $PATH variable.

11. Now that we have “Go 1.4.3” installed, we now have to upgrade to “Go 1.5” for the Kubernetes Dashboard. You can do this the long way round by creating your own bootstrap, which you need another machine for, or thanks to the work of Dave Cheney, he has already published a public bootstrap for ARM on his website which we will be using. To use Dave Cheney’s bootstrap, you can either run the below commands one by one, or alternatively create a script to run them by doing the following:

nano upgradeGo

and paste this script into the file:

#!/bin/bash
cd $HOME
curl http://dave.cheney.net/paste/go-linux-arm-bootstrap-c788a8e.tbz | tar xj
curl https://storage.googleapis.com/golang/go1.5.src.tar.gz | tar xz
ulimit -s 1024     # set the thread stack limit to 1mb
ulimit -s          # check that it worked
cd $HOME/go/src
env GO_TEST_TIMEOUT_SCALE=10 GOROOT_BOOTSTRAP=$HOME/go-linux-arm-bootstrap ./all.bash

12. Save the script and give it execute permissions

chmod +x upgradeGo

13. Run the script as root.  Be aware, this does take a while to run and there are times when no updates are being displayed. It may also fail on the tests but running /root/go/bin/go version should show return “go version go1.5 linux/arm” once complete.

./upgradeGo

14. As we ran the upgrade Go script as root, we now need to move it from the root folder it was built in, to the alarm home folder.
Firstly, we have to remove the 1.4.3 Go directory from the home directory of alarm.

rm -rf /home/alarm/go

then, we move the folder from root/go to alarm/go

mv /root/go /home/alarm/go

Finally, to check that the folder has moved correctly:

ls /home/alarm/go

If the folder has been moved correctly, it should display the following:
alarmGoMove

Log out of the root account.

15. In order to see if it is still running correctly, test go again using the file we created earlier.

go run helloWorld.go

16. Also, recheck the Go version to ensure it returns that it is now version 1.5

go version

With the full preparation done, we moved onto building the Kubernetes Dashboard.

Building the Dashboard

1. For security reasons, the dashboard should be run as a standard user, not as root.  Therefore, as alarm, we start by cloning the latest Git release for Kubernetes Dashboard

git clone https://github.com/kubernetes/dashboard.git

2. Change to the dashboard directory

cd dashboard

3. Install the dashboard packages. This takes around 3 hours and requires the terminal to stay active throughout the process.  If the terminal becomes inactive or a remote shell is lost, you will have to restart the process.  Fortunately, it will continue from where it stopped. You may however get an error stating that “node sass” cannot be downloaded. If you receive this error, follow the below steps to manually download it once the main install has finished.

npm install

4. Optional: Install node sass if you received the above mentioned error.  This can take up to 15 minutes.

npm install node-sass

5. Log in as root and install bower.  This has to be done as root, but once you have installed bower, remember to exit the superuser.

bower install –allow-root

6. Now ready to run the dashboard.  To launch the dashboard:

gulp serve

Remember, this should be done in a standard user account.
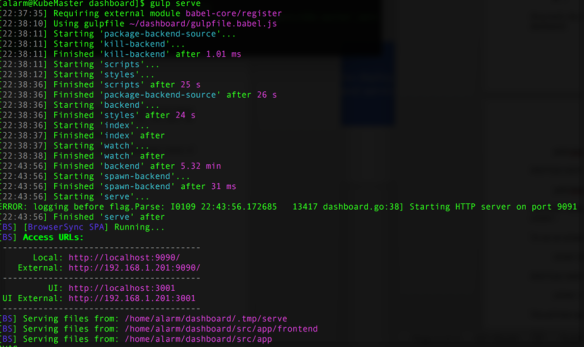
gulpServe

7. You can see that this is up and running, as our screenshot displays the access URL’s.  To view it in a browser, simply open your web browser and go to your Pi’s IP address, as shown in your terminal.  In our case above, our IP Address is listed as http://192.168.1.201:9090 but yours may vary. This will show the test/debug version of the Kubernetes dashboard.

You can access the debugging console by going to the UI address listed in the terminal.  In our case, this was http://192.168.1.201:3001

8. To remove the debugging console and run a production version of Kubernetes dashboard:

gulp build

9. Once this is built, it is placed in the dist folder. To run the production version of Kubernetes dashboard:

gulp serve:prod

10. Open your web browser and go to your Pi’s IP address.  Again, this will vary, ours was http://192.168.1.201:9090 so check the output in the terminal window to find the IP Address if you are unsure.

Kubernetes dashboard should now be up and running.
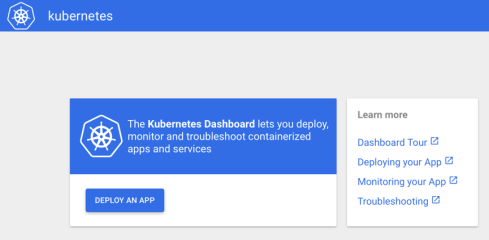
dash

At present the Kubernetes dashboard requires an active terminal to be able to run, in order to bypass this, we used “Screen”, which runs a detached non-active terminal in the background, which means we didn’t need a running active terminal.

1. Install Screen

pacman –Sy screen

2. Open the dashboard directory

cd dashboard

3. Run screen

screen -fa -d -m gulp serve:prod

This will run in the background.

4. To see the process

screen –r

This will show either the detached terminal you are using to run the Kubernetes Dashboard, or it will list all the running screen processes.  To reattach a specific screen process, you will need to include the screen ID produced from the above command.

To detach from the screen and leave it running, press: ctrl + a + d

To completely end the process and stop the dashboard from running, use: ctrl + x on the running screen terminal.

Quick recap:
At present, the dashboard is still a work in production. Some links may not work, and is limited functonality at the time of writing this post. Keep your eye on the Kubernetes Dashboard project on github for further releases.


Running Hadoop Java and C++ Word Count example on Raspberry Pi

I hear that hadoop is incredibly slow on pi from various blog posts, and yes pls lower your hope as the speed is really appalling. But it is very interesting to see how slow it can be on the pi.

This post assumes you already have hadoop installed and configured on your pi. Before we start, we need to increase swap file size if your pi is 256MB ver. otherwise your pi will run out of memory.

1. Increase the swap file size (I stole this from David’s post)

hduser@raspberrypi ~ $ pico /etc/dphys-swapfile
change the value to 500 (MB)
hduser@raspberrypi ~ $ sudo dphys-swapfile setup
hduser@raspberrypi ~ $ sudo reboot

2. Download the example file

go http://www.gutenberg.org/ebooks/20417 and download the plain text e-book. Assuming you have downloaded the file to your home directory, we then copy this file to HDFS.

hduser@raspberrypi ~ $ start-all.sh
hduser@raspberrypi ~ $ hadoop dfs -copyFromLocal pg20417.txt /user/hduser/wordcount/pg20417.txt 

You can the check the file existence similar to ls command

hduser@raspberrypi ~ $ hadoop dfs -ls /user/hduser/wordcount

3.  Run example Java wordcount example

hduser@raspberrypi ~ $ hadoop jar /usr/local/hadoop/hadoop-examples-1.1.2.jar wordcount /user/hduser/wordcount /user/hduser/wordcount-output

Now, be patient! it will take approx. 8 minutes to complete….

4. Check execution result

hduser@raspberrypi ~ $ hadoop dfs -cat /user/hduser/wordcount-output/part-r-00000

5. C++ wordcount example

Getting hadoop pipes to run on pi needs a little more effort (hacking?) as we will need to build some pi compatible libraries. Particularly we’ll want libhdfs libhadooppipes as well as libhadooputils.

Let’s get the build environment ready first.

hduser@raspberrypi ~ $ apt-get install libssl-dev

go to /usr/local/hadoop/src/c++/libhdfs/ and edit the configure file, so it will run without errors.

in configure file, find the comment out the following two lines.

as_fn_error $? "Unsupported CPU architecture \"$host_cpu\"" "$LINENO" 5;;

and

define size_t unsigned int

Those are all hackings we need to do. Next,

hduser@raspberrypi ~ $ ./configure --prefix=/usr/local/hadoop/c++/Linux-i386-32
hduser@raspberrypi ~ $ make
hduser@raspberrypi ~ $ make install

We’re almost done, just do the same for pipes and utils. Once finished, you’ll have pi compatible libraries and just build the wordcount.cpp with Makefile given below.

wordcount.cpp

#include <algorithm>
#include <limits>
#include <string>

#include  "stdint.h"  // <--- to prevent uint64_t errors! 

#include "hadoop/Pipes.hh"
#include "hadoop/TemplateFactory.hh"
#include "hadoop/StringUtils.hh"

using namespace std;

class WordCountMapper : public HadoopPipes::Mapper {
public:
  // constructor: does nothing
  WordCountMapper( HadoopPipes::TaskContext& context ) {
  }

  // map function: receives a line, outputs (word,"1")
  // to reducer.
  void map( HadoopPipes::MapContext& context ) {
    //--- get line of text ---
    string line = context.getInputValue();

    //--- split it into words ---
    vector< string > words =
      HadoopUtils::splitString( line, " " );

    //--- emit each word tuple (word, "1" ) ---
    for ( unsigned int i=0; i < words.size(); i++ ) {
      context.emit( words[i], HadoopUtils::toString( 1 ) );
    }
  }
};

class WordCountReducer : public HadoopPipes::Reducer {
public:
  // constructor: does nothing
  WordCountReducer(HadoopPipes::TaskContext& context) {
  }

  // reduce function
  void reduce( HadoopPipes::ReduceContext& context ) {
    int count = 0;

    //--- get all tuples with the same key, and count their numbers ---
    while ( context.nextValue() ) {
      count += HadoopUtils::toInt( context.getInputValue() );
    }

    //--- emit (word, count) ---
    context.emit(context.getInputKey(), HadoopUtils::toString( count ));
  }
};

int main(int argc, char *argv[]) {
  return HadoopPipes::runTask(HadoopPipes::TemplateFactory< 
			      WordCountMapper, 
                              WordCountReducer >() );
}

Makefile

CC = g++
HADOOP_INSTALL = /usr/local/hadoop
PLATFORM = Linux-i386-32
CPPFLAGS =  -I$(HADOOP_INSTALL)/c++/$(PLATFORM)/include

wordcount: wordcount.cpp
     $(CC) $(CPPFLAGS) $< -Wall -L$(HADOOP_INSTALL)/c++/$(PLATFORM)/lib -lhadooppipes \
     -lhadooputils -lpthread -lcrypto -lssl -g -O2 -o $

Remark: on my 256BM ver.B pi, C++ wordcount take about 10 minutes to finish.

References:

[1] http://cs.smith.edu/dftwiki/index.php/Hadoop_Tutorial_2.2_–_Running_C%2B%2B_Programs_on_Hadoop

[2] http://www.michael-noll.com/tutorials/running-hadoop-on-ubuntu-linux-single-node-cluster/#Copy_local_example_data_to_HDFS

Getting hadoop to run on the Raspberry Pi

Hadoop was implemented on Java, so getting it to run on the Pi is just as easy as doing so on x86 servers. First of all, we need JVM for pi. You can either get OpenJDK or Oracle’s JDK 8 for ARM Early Access. I would personally recommended JDK8 as it is **just a little slightly* faster than OpenJDK, which is easier to install.

1. Install Java

Installing OpenJDK is easy, just do and wait

pi@raspberrypi ~ $ sudo apt-get install openjdk-7-jdk
pi@raspberrypi ~ $ java -version
java version "1.7.0_07"
OpenJDK Runtime Environment (IcedTea7 2.3.2) (7u7-2.3.2a-1+rpi1)
OpenJDK Zero VM (build 22.0-b10, mixed mode)

Alternatively, you can install Oracle’s JDK 8 for ARM Early Access (some said it was optimized for Pi).
First get it from here: https://jdk8.java.net/fxarmpreview/index.html

pi@raspberrypi ~ $ sudo tar zxvf jdk-8-ea-b36e-linux-arm-hflt-*.tar.gz -C /opt
pi@raspberrypi ~ $ sudo update-alternatives --install "/usr/bin/java" 
"java" "/opt/jdk1.8.0/bin/java" 1 
pi@raspberrypi ~ $ java -version
java version "1.8.0-ea"
Java(TM) SE Runtime Environment (build 1.8.0-ea-b36e)
Java HotSpot(TM) Client VM (build 25.0-b04, mixed mode)

If you have both versions installed, you can use switch between them with

sudo update-alternatives --config java

2. Create a hadoop system user

pi@raspberrypi ~ $ sudo addgroup hadoop
pi@raspberrypi ~ $ sudo adduser --ingroup hadoop hduser
pi@raspberrypi ~ $ sudo adduser hduser sudo

3. Setup SSH

pi@raspberrypi ~ $ su - hduser
hduser@raspberrypi ~ $ ssh-keygen -t rsa -P ""

This will create an RSA key pair with an empty password. It is done so to stop Hadoop prompting for the passphrase when in talks to its nodes

hduser@raspberrypi ~ $ cat ~/.ssh/id_rsa.pub >> ~/.ssh/authorized_keys

Now SSH access to your local machine is enabled with this newly created key

hduser@raspberrypi ~ $ ssh localhost

You should be good to login without password

4. Download (install?) Hadoop
Download hadoop from http://www.apache.org/dyn/closer.cgi/hadoop/core

hduser@raspberrypi ~ $ wget http://mirror.catn.com/pub/apache/hadoop/core/hadoop-1.1.2/hadoop-1.1.2.tar.gz
hduser@raspberrypi ~ $ sudo tar vxzf hadoop-1.1.2.tar.gz -C /usr/local
hduser@raspberrypi ~ $ cd /usr/local
hduser@raspberrypi /usr/local $ sudo mv hadoop-1.1.2 hadoop
hduser@raspberrypi /usr/local $ sudo chown -R hduser:hadoop hadoop

Now hadoop has been installed and ready to roll (not yet). Edit .bashrc under your home, and append the following lines

export JAVA_HOME=/usr/lib/jvm/java-6-openjdk-armhf
export HADOOP_INSTALL=/usr/local/hadoop
export PATH=$PATH:$HADOOP_INSTALL/bin

modify JAVA_HOME accordingly if you use oracle’s version.

Reboot Pi and verify the installation:

hduser@raspberrypi ~ $ hadoop version
Hadoop 1.1.2
Subversion https://svn.apache.org/repos/asf/hadoop/common/branches/
branch-1.1 -r 1440782
Compiled by hortonfo on Thu Jan 31 02:03:24 UTC 2013
From source with checksum c720ddcf4b926991de7467d253a79b8b

5. Configure Hadoop
NOTE: this how-to is just a minimal configuration for single-node mode hadoop

configuration files are at "/usr/local/hadoop/conf/", and will need to 
edit core-site.xml, hdfs-site.xml, mapred-site.xml

core-site.xml

<configuration>
  <property>
    <name>hadoop.tmp.dir</name>
    <value>/fs/hadoop/tmp</value>
  </property>
  <property>
    <name>fs.default.name</name>
    <value>hdfs://localhost:54310</value>
  </property>
</configuration>

mapred-site.xml

<configuration>
  <property>
    <name>mapred.job.tracker</name>
    <value>localhost:54311</value>
  </property>
</configuration>

hdfs-site.xml

<configuration>
  <property>
    <name>dfs.replication</name>
    <value>1</value>
  </property>
</configuration>

OK, we’re almost done, one last step.

hduser@raspberrypi ~ $ sudo mkdir -p /fs/hadoop/tmp
hduser@raspberrypi ~ $ sudo chown hduser:hadoop /fs/hadoop/tmp
hduser@raspberrypi ~ $ sudo chmod 750 /fs/hadoop/tmp
hduser@raspberrypi ~ $ hadoop namenode -format

ATTENTION:

If you use JDK 8 for hadoop, you need to force DataNode to run in JVM client mode as JDK 8 does not support server yet. Go to /usr/local/hadoop/bin and edit hadoop file (please create a backup first). Assuming you’re using nano, the procedure is as follows.  nano hadoop, ctrl-w to search for “-server” argument. What you need is to delete “-server” and then save & exit.

Now hadoop single-node system is ready. Below are some useful commands.

1. jps           // will report the local VM identifier
2. start-all.sh  // will start all hadoop processes
3. stop-all.sh   // will stop all hadoop processes


References:

[1] http://raspberrypi.stackexchange.com/questions/4683/how-to-install-java-jdk-on-raspberry-pi
[2] http://www.michael-noll.com/tutorials/running-hadoop-on-ubuntu-linux-single-node-cluster/

Creating an LXC Container on the Raspberry Pi

This post assumes you’ve followed the instructions in our post “Building an LXC-friendly Kernel on the Raspberry Pi” to get kernel support working and install the lxc tools from the LXC git repository.

Mount a cgroup

# pico /etc/fstab

# add the line “lxc /sys/fs/cgroup cgroup defaults 0 0”

# mount -a

Create a Directory to Store Hosts

# mkdir -p /var/lxc/guests

Create a File System for the Container

Let’s create a container called “test”.

First, create a filesystem for the container. This may take some time

# apt-get install debootstrap

# mkdir -p /var/lxc/guests/test

# debootstrap wheezy /var/lxc/guests/test/fs/ http://archive.raspbian.org/raspbian

Modify the Container’s File System

# chroot /var/lxc/guests/test/fs/

Change the root password.

# passwd

Change the hostname as you wish.

# pico /etc/hostname

undo chroot

# exit

Create a Minimal Configuration File

# pico /var/lxc/guests/test/config

Enter the following:

lxc.utsname = test

lxc.tty = 2

lxc.rootfs = /var/lxc/guests/test/fs

Create the Container

lxc-create -f /var/lxc/guests/test/config -n test

Test the Container

# lxc-start -n test -d

[wait for a while, a few minutes]

# lxc-console -n test -t 1

Building an LXC-friendly Kernel for the Raspberry Pi

This post is heavily based on Yohei Kuga’s post on Google+

https://plus.google.com/113091037050058478853/posts/8tYdBrbxu8i

We’ve spent a lot of time installing LXC in various ways and using different configurations. Recently Yohei Kuga posted a neat and minimal process, which was certainly more streamlined than our approach. I’ve expanded his notes and tested everything to ensure it works.

Download Raspbian and bake an SD Card

See:

http://www.raspberrypi.org/downloads

We used the 2013-02-09-wheezy-raspbian.zip image.

We made no other changes to this image other than those instructions listed below.

Switch to Root User on the Pi

These commands must be run as root. You can use “su”, or for convenience (I know):

# sudo su root

Expand to fill SD Card

Expand to fill SD card and reboot after entering:

# raspi-config

Update Raspbian

# apt-get update

# apt-get dist-upgrade

Install git

# sudo apt-get install git-core

Update Firmware

The clone will take a while. You might consider cloning on a desktop machine to save time. Just transfer the firmware/boot and modules/ directories from your desktop PC to the Pi after the checkout.

# cd /opt

# git clone git://github.com/raspberrypi/firmware.git

# cd firmware/boot

# cp * /boot

# cd ../modules

# cp -r * /lib/modules

# reboot

Increase the Swap File Size

I found that in order to check out the source on the Pi, you’ll need a swap file with the 256MB Pi, otherwise it will run out of RAM during the checkout (with fatal: index-pack failed).

# pico /etc/dphys-swapfile

# change to 500 (MB)

# sudo dphys-swapfile setup

# reboot

Prepare to Build Kernel

The clone will take a while. Again, you may consider using a desktop PC. Of course, if you do that, you’ll need to issue the “zcat” command from your Pi and copy the resulting “.config” file to the “linux” directory on your desktop PC.

# cd /opt

# mkdir raspberrypi

# cd raspberrypi

# git clone git://github.com/raspberrypi/linux.git

# cd linux

# zcat /proc/config.gz > .config

Decrease the Swap Space File

# pico /etc/dphys-swapfile

# change to 100 (MB)

# dphys-swapfile setup

# reboot

Install Packages for Kernel Compilation

# apt-get install ncurses-dev

Kernel Options

You’ll now need to set some kernel options to support LXC, via the menu config tool.

# cd /opt/raspberrypi/linx

# make menuconfig

You need to enable these options:

* General -> Control Group Support -> Memory Resource Controller for Control Groups (*and its three child options*)

(this has high overhead;only enable if you really need it, or else enable and remember to disable using the Kernel command line option “cgroup_disable=memory”)

* General -> Control Group Support -> cpuset support

* Device Drivers -> Character Devices -> Support multiple instances of devpts

* Device Drivers -> Network Device Support -> Virtual ethernet pair device

Build Kernel 

# make

# make modules_install

# cd /opt/raspberrypi

# git clone git://github.com/raspberrypi/tools.git

# cd tools/mkimage

# python ./imagetool-uncompressed.py /opt/raspberrypi/linux/arch/arm/boot/Image

# cp /boot/kernel.img /boot/kernel-old.img

# cp kernel.img /boot/

# reboot

Download Latest LXC

The LXC tools provided with Raspbian are out-of-date.

# mkdir /opt/lxc

# cd /opt/lxc

# git clone https://github.com/lxc/lxc.git

# apt-get install automake libcap-dev

# cd lxc

# ./autogen.sh && ./configure && make && make install

Testing the Install

Check LXC is happy with your kernel:

# lxc-checkconfig

User namespace should be “missing” (it checks for a kernel option that no longer exists) and Cgroup namespace should say “required”.