Research Success

Posco at John Moores has been investigating the overhead of lightweight virtualization on a Raspberry Pi cloud infrastructure. His work is published in a recent issue of the Microelectronics journal. Headline – virtualization does come at a price, especially for compute-intensive workloads.


Jeremy has stuck Raspberry Pi sensor nodes all over the School of Computing Science at Glasgow. The sensors gather environmental data – check current status here. This is part of Glasgow’s smart campus initiative. His work will be published in the IEEE FICloud 2016 conference.

Kubernetes Dashboard – Run as Docker Image on Raspberry Pi 2.

The docker image has now been fixed for ARMv7 by the Google Kubernetes Dashboard team as of 19th January 2016.

Due to the change in the code, you can now build and run Dashboard in a Docker image, rather than having to serve it or use ‘Screen’ as per my previous blog post here.

So first things first, we need to update our code base to the latest version of Kubernetes Dashboard from their Github by running the following command inside our Dashboard directory:

git pull https://github.com/kubernetes/dashboard.git

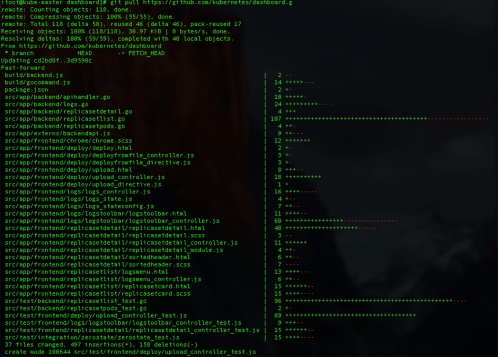
This then downloads and checks the latest files against the currently installed files and updates them accordingly, as shown in the below screenshot.

KubeDashUpdate

In order to build and run the Docker image, we need to do the following:

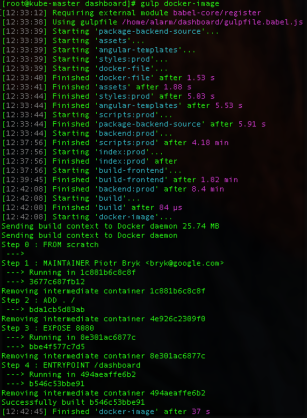
gulp docker-image

gulpDockerImage

You can then check that the Docker image has been built by running:

docker images

dockerImage

Finally, to run the Docker image, we use the following command:

docker run –d –p :9090:9090 kubernetes/dashboard –apiserver-host=http://192.168.1.201:8080

You will need to change the IP address of the Api server host to match your Master node, in our case our Master is on 192.168.1.201.

The dashboard should now be running in a tiny docker image, without the need for screen or an active running terminal.

You can check this with:

docker ps

dockerPS

Thank you to Piotr Bryk for updating the build code and fixing this issue!
Keep an eye on the Kubernetes github here for further updates as they seem to be coming in thick and fast and you can update your Dash at any time, using this method.

Kubernetes Dashboard on Raspberry Pi 2

Google are currently working on a Dashboard UI for their Kubernetes orchestration tool. This is still a work in progress and not yet ready for production, however, they aim to have a BETA release end of January and a stable release towards the end of February. We have managed to get this working, ready for the BETA release.
This will replace the current kube-ui.

What you will need (at least):
2 x SD cards loaded with Arch Linux ARM & Kubernetes. (Covered in our previous blog post here)
2 x Raspberry Pi 2 Model B

Preparation
In order to get the Dashboard working, there are a number of software dependencies that need to be installed and configured first.
• Docker 1.3+
• Go 1.5+
• NodeJS 4.2.2+
• NPM 1.3+
• Etcd 2.2+
• Java 7+
• Gulp 3.9+
• Python
• Python2
• Make
• Bower
• GCC

Preparation Installation
Docker should already be installed, and we will be leaving Go till last. I prefer doing this in steps as sometimes mirror connections fail, but there is a single command, shown below the steps.
1. Open a terminal on your Master Kubernetes Node.
2. Log into the root account using su and the root password.
3. Install Node JS and NPM.

pacman -S nodejs npm

4. Install Java 7.  When we were testing with the later versions of Java, we ran into issues with compiling the dashboard, therefore we stuck with JDK 7.

pacman -S jd7-openjdk

5. Install Gulp

pacman -S gulp

6. Install Python and Python 2

pacman -S python python2

7. Install Make

pacman -S make

8. Install Bower

pacman -S bower

9. Install GCC

pacman -S gcc

To install all the dependencies in one go, you can use the following command:

pacman –S nodejs npm jdk7-openjdk gulp python python2 make bower gcc

Now, we are going to build Go. At the time of writing, there is not a working version of Go 1.5 for ARMv7, therefore we have to firstly install the older 1.4.3 version from the public repository and then manually build 1.5 on an ARMv7 platform.

1. Clone the “Go” repository.

git clone https://go.googlesource.com/go

2. Change directory to “Go”.

cd go

3. Checkout “Go 1.4.3”.

git checkout go1.4.3

4. Change directory to “src”.

cd src

5. Run the bash script in order to build Go 1.4.3.

./all.bash

6. As Go is installed in our user’s home directory, in order to reference this, we need to add the command “Go” to the user’s $PATH.

nano /home/alarm/.bashrc

and input at the bottom of the file:

export GOROOT=$HOME/go

export PATH=$PATH:$GOROOT/bin

7. Log out and back in to the shell as user “alarm”, not “root”
8. Check that “Go” is installed the version correctly and the $PATH has been setup.

go version

This should display the following:
goVersion

9. To check that “Go” is now installed and working correctly, we created a simple “Hello, World” script:

nano helloWorld.go

and pasted this into the file:

package main

import “fmt”
func main() {
fmt.Printf(“hello, world\n”)
}

save and exit.

10. Run the file.

go run helloWorld.go

This should return the following:

helloWorld
If this is not displayed and you receive an error saying “Go not found”, go back and ensure that “Go” has been added to your $PATH variable.

11. Now that we have “Go 1.4.3” installed, we now have to upgrade to “Go 1.5” for the Kubernetes Dashboard. You can do this the long way round by creating your own bootstrap, which you need another machine for, or thanks to the work of Dave Cheney, he has already published a public bootstrap for ARM on his website which we will be using. To use Dave Cheney’s bootstrap, you can either run the below commands one by one, or alternatively create a script to run them by doing the following:

nano upgradeGo

and paste this script into the file:

#!/bin/bash
cd $HOME
curl http://dave.cheney.net/paste/go-linux-arm-bootstrap-c788a8e.tbz | tar xj
curl https://storage.googleapis.com/golang/go1.5.src.tar.gz | tar xz
ulimit -s 1024     # set the thread stack limit to 1mb
ulimit -s          # check that it worked
cd $HOME/go/src
env GO_TEST_TIMEOUT_SCALE=10 GOROOT_BOOTSTRAP=$HOME/go-linux-arm-bootstrap ./all.bash

12. Save the script and give it execute permissions

chmod +x upgradeGo

13. Run the script as root.  Be aware, this does take a while to run and there are times when no updates are being displayed. It may also fail on the tests but running /root/go/bin/go version should show return “go version go1.5 linux/arm” once complete.

./upgradeGo

14. As we ran the upgrade Go script as root, we now need to move it from the root folder it was built in, to the alarm home folder.
Firstly, we have to remove the 1.4.3 Go directory from the home directory of alarm.

rm -rf /home/alarm/go

then, we move the folder from root/go to alarm/go

mv /root/go /home/alarm/go

Finally, to check that the folder has moved correctly:

ls /home/alarm/go

If the folder has been moved correctly, it should display the following:
alarmGoMove

Log out of the root account.

15. In order to see if it is still running correctly, test go again using the file we created earlier.

go run helloWorld.go

16. Also, recheck the Go version to ensure it returns that it is now version 1.5

go version

With the full preparation done, we moved onto building the Kubernetes Dashboard.

Building the Dashboard

1. For security reasons, the dashboard should be run as a standard user, not as root.  Therefore, as alarm, we start by cloning the latest Git release for Kubernetes Dashboard

git clone https://github.com/kubernetes/dashboard.git

2. Change to the dashboard directory

cd dashboard

3. Install the dashboard packages. This takes around 3 hours and requires the terminal to stay active throughout the process.  If the terminal becomes inactive or a remote shell is lost, you will have to restart the process.  Fortunately, it will continue from where it stopped. You may however get an error stating that “node sass” cannot be downloaded. If you receive this error, follow the below steps to manually download it once the main install has finished.

npm install

4. Optional: Install node sass if you received the above mentioned error.  This can take up to 15 minutes.

npm install node-sass

5. Log in as root and install bower.  This has to be done as root, but once you have installed bower, remember to exit the superuser.

bower install –allow-root

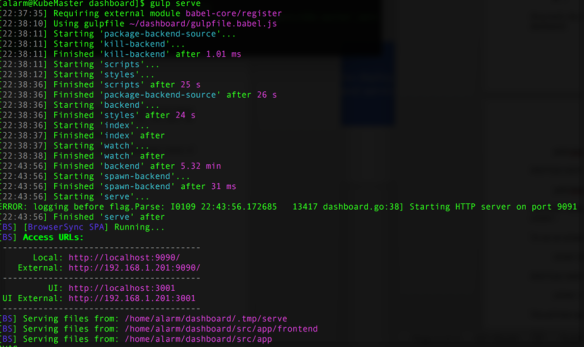
6. Now ready to run the dashboard.  To launch the dashboard:

gulp serve

Remember, this should be done in a standard user account.
gulpServe

7. You can see that this is up and running, as our screenshot displays the access URL’s.  To view it in a browser, simply open your web browser and go to your Pi’s IP address, as shown in your terminal.  In our case above, our IP Address is listed as http://192.168.1.201:9090 but yours may vary. This will show the test/debug version of the Kubernetes dashboard.

You can access the debugging console by going to the UI address listed in the terminal.  In our case, this was http://192.168.1.201:3001

8. To remove the debugging console and run a production version of Kubernetes dashboard:

gulp build

9. Once this is built, it is placed in the dist folder. To run the production version of Kubernetes dashboard:

gulp serve:prod

10. Open your web browser and go to your Pi’s IP address.  Again, this will vary, ours was http://192.168.1.201:9090 so check the output in the terminal window to find the IP Address if you are unsure.

Kubernetes dashboard should now be up and running.
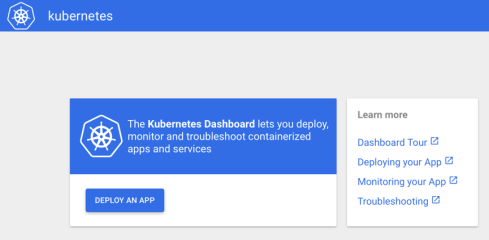
dash

At present the Kubernetes dashboard requires an active terminal to be able to run, in order to bypass this, we used “Screen”, which runs a detached non-active terminal in the background, which means we didn’t need a running active terminal.

1. Install Screen

pacman –Sy screen

2. Open the dashboard directory

cd dashboard

3. Run screen

screen -fa -d -m gulp serve:prod

This will run in the background.

4. To see the process

screen –r

This will show either the detached terminal you are using to run the Kubernetes Dashboard, or it will list all the running screen processes.  To reattach a specific screen process, you will need to include the screen ID produced from the above command.

To detach from the screen and leave it running, press: ctrl + a + d

To completely end the process and stop the dashboard from running, use: ctrl + x on the running screen terminal.

Quick recap:
At present, the dashboard is still a work in production. Some links may not work, and is limited functonality at the time of writing this post. Keep your eye on the Kubernetes Dashboard project on github for further releases.



HOW TO: Kubernetes Multi-node on Raspberry Pi 2s

Google’s Kubernetes is a powerful orchestration tool for containerised applications across multiple hosts. We achieved the first fully running implementation of Kubernetes on Raspberry Pi 2 today, and thanks to the ease of docker, you can too.

You will need:

At least 2 Raspberry Pi 2s

Two SD cards loaded with Arch Linux | ARM

First, we need to install docker and ntpd on all the machines (the Pis need to have the correct time to download docker images):


pacman -S Docker ntpd

Just hit y to continue. I recommend that you reboot your Pis after this so that both services come up cleanly. Now we need to create a setup implementing this:

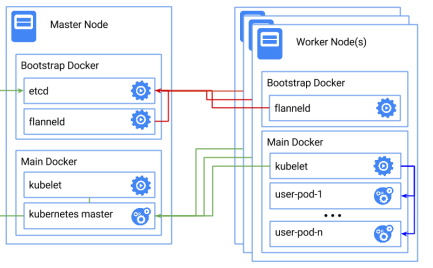
k8s-docker

Select a Pi to be Pi master, and ssh in. I recommend that you to su root for the following. Then run the this command to bring up docker-bootstrap.


sh -c 'docker -d -H unix:///var/run/docker-bootstrap.sock -p /var/run/docker-bootstrap.pid --iptables=false --ip-masq=false --bridge=none --graph=/var/lib/docker-bootstrap 2> /var/log/docker-bootstrap.log 1> /dev/null &'

Then we need to bring up etcd, the key value store used by Kubernetes. This command and any other docker run command with a new container might take a little while when first running, as docker will need to download the container. I’m working on shrinking the images to make this less of a pain.


docker -H unix:///var/run/docker-bootstrap.sock run --net=host -d andrewpsuedonym/etcd:2.1.1 /bin/etcd --addr=127.0.0.1:4001 --bind-addr=0.0.0.0:4001 –data-dir=/var/etcd/data

Then we should reserve a CIDR range for flannel


docker -H unix:///var/run/docker-bootstrap.sock run --net=host andrewpsuedonym/etcd:2.1.1 etcdctl set /coreos.com/network/config '{ "Network": "10.1.0.0/16" }'

Now we need to stop docker so that we can reconfigure it to use flannel.

systemctl stop docker

Run flannel itself on docker-bootstrap. This command should print a long hash, which is the id of the container


docker -H unix:///var/run/docker-bootstrap.sock run -d --net=host --privileged -v /dev/net:/dev/net andrewpsuedonym/flanneld flanneld

Then we need to get its subnet information.

docker -H unix:///var/run/docker-bootstrap.sock exec <long-hash-from-above-here> cat /run/flannel/subnet.env

This should print out something like this


FLANNEL_SUBNET=10.1.78.1/24
FLANNEL_MTU=1472
FLANNEL_IPMASQ=false

Now we need to configure docker to use this subnet, which is very simple. All we need to do is edit the docker.service file.


nano /usr/lib/systemd/system/docker.service

Then change the line which starts with ExecStart to include the flags –bip and –mtu. It should end up looking something like this.

ExecStart=/usr/bin/docker –bip=FLANNEL_SUBNET –mtu=FLANNEL_MTU -d -H fd://

Now we need to take down the network bridge docker0.


/sbin/ifconfig
docker0 down
brctl delbr docker0

Then we can start Docker up again


systemctl start docker

Now it’s time to launch kubernetes!
This launches the master


docker run --net=host --privileged -d -v /sys:/sys:ro -v /var/run/docker.sock:/var/run/docker.sock  andrewpsuedonym/hyperkube hyperkube kubelet --api-servers=http://localhost:8080 --v=2 --address=0.0.0.0 --enable-server --hostname-override=127.0.0.1
--config=/etc/kubernetes/manifests-multi –pod-infra-container-image=andrewpsuedonym/pause

And then this launches the proxy


docker run -d --net=host --privileged andrewpsuedonym/hyperkube:v1.0.1 /hyperkube proxy --master=http://127.0.0.1:8080 --v=2

You should now have a functioning one node cluster. Download the kubectl binary from here, and then if you run


./kubectl get nodes

You should see your node appear. Now for the first worker node.
These instructions be applied as many times as necessary to gain however many worker nodes you need.
We’ll need a docker-bootstrap again for flannel.


sh -c 'docker -d -H unix:///var/run/docker-bootstrap.sock -p /var/run/docker-bootstrap.pid --iptables=false --ip-masq=false
--bridge=none --graph=/var/lib/docker-bootstrap 2>
/var/log/docker-bootstrap.log 1> /dev/null &'

Then we should stop docker


systemctl stop docker

And add flanneld. This node doesn’t need etcd running on it, because it will use the running etcd from the master node.


docker -H unix:///var/run/docker-bootstrap.sock run -d --net=host --privileged -v /dev/net:/dev/net andrewpsuedonym/flanneld flanneld –etcd-endpoints=http://MASTER_IP:4001

The master IP address is the IP address of the first node we set up. You can
check that you have the right ip by running


curl MASTER_IP:4001

You should get a 404 response.

As before, we need to get the subnet information.


docker -H unix:///var/run/docker-bootstrap.sock exec <long-hash-from-above-here> cat /run/flannel/subnet.env

and edit the /usr/lib/systemd/system/docker.service file to include –bip=FLANNEL_SUBNET –mtu=FLANNEL_MTU when launching docker, just like we did before
Now we bring down docker’s network bridge and reload it.


/sbin/ifconfig docker0 down
brctl delbr docker0
systemctl daemon-reload
systemctl start docker

This Pi is ready for kubernetes now


docker run --net=host -d -v /var/run/docker.sock:/var/run/docker.sock andrewpsuedonym/hyperkube hyperkube kubelet --api-servers=http://${MASTER_IP}:8080 --v=2 --address=0.0.0.0 --enable-server --hostname-override=$(hostname -i) –pod-infra-container-image=andrewpsuedonym/pause

docker run -d --net=host --privileged andrewpsuedonym/hyperkube hyperkube proxy --master=http://${MASTER_IP}:8080 –v=2

Running kubectl get nodes on the original Pi should now return both nodes.

up

Graphs and Results!

It’s been a busy fortnight. Much has been done, so I’ll get straight down to business.

Hadoop, being java based, was not overly difficult to package into a container and get running. However, proving that it was capable of networking between containers or even hosts looked like too much of a time sink, and so it has only been tested out as a single node. You can find the dockerfile here, and the container itself here.

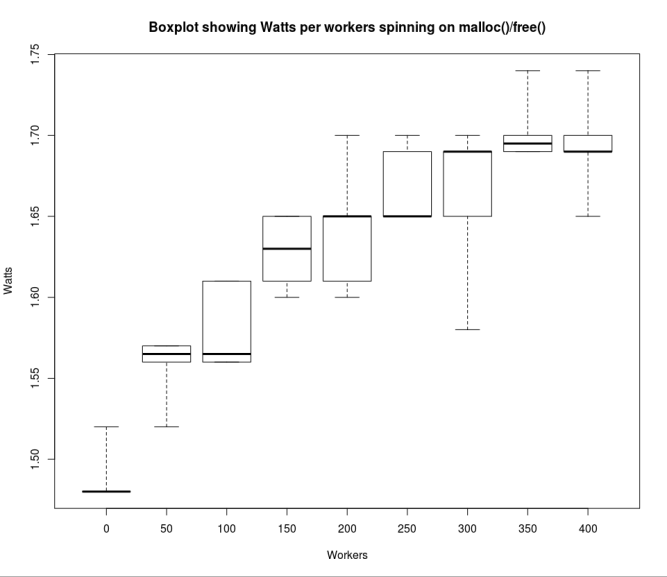
It was a great shame that Hadoop was not the success I’d hoped for, because I would have liked to have used it for benchmarking. Instead, after much pontification, I decided to go with Stress, which although it doesn’t claim to be able to set specific CPU loads, it at least fulfils the functions it claims it can do. Lookbusy on the other hand is supposed to be able to set CPU loads as a %, but instead only lets you choose how many cores hit 100% usage. With Stress, and through adjusting the amount of calls to malloc()/free(), I was able to simulate different CPU loads, and here’s the box plot that emerged. Each measurement was taken 10 times, and the command used was:
stress -i 250 –vm-bytes 4 -t 25 -d 2 -m [VARIABLE].


workerswattsboxplot


I also managed to get some interesting read write speed data, which I present here alongside the best raspberry pi 1 readings we achieved

Command used: ./iozone -e -I -a -s 50M -r 4k -r 512k -r 16M -i 0 -i 1 -R

Raspberry Pi 2 w/ 32 GB Sandisk Extreme micro SD

Random Write 4K : 2.1 MB/s
Random Read 4K: 6.7 MB/s
Random Write 512K: 17.7MB/s
Random Read 512K: 19MB/s
Random Write 16MB: 18.388MB/s
Random Read 16MB: 19.2MB/s

Raspberry Pi w/ 16 GB Sandisk Ultra SD card
Random Write 4K : 1.0MB/s
Random Read 4K: 4.2MB/s
Random Write 512K: 19.8MB/s
Random Read 512K: 21MB/s
Random Write 16MB: 21.2MB/s
Random Read 16MB:22MB/s

As you can see, for larger files the Pi 2 is slightly slower, but we’re not sure why yet. It may well be the larger data capacity of the micro SD cards.

It was then time to stress test our defenceless Pi Cloud. I used SaltStack to send a punishing stress command to all 14 Pis, which they had to maintain for ten minutes. Each rack of seven suffered one failure. A single Pi could grind through this command, but the strain of seven was too much for our measly three amp USB hubs, but we have some new ones due for delivery on Monday. This of course means we’ll have to redesign the towers again, but then the struggle towards perfection is eternal, and sometimes fun. A 3d model of the finished design will be made freely available for replication when we have it. The other fruits of my labour can be found in my docker hub repository, here.

Learning Lessons

I’ve learned one of the most valuables lesson of my internship this week, and it’s definitely the most counter-intuitive one so far. It was also the most vexing.

The most annoying lessons that we learn in our life are never new pieces of knowledge, gifted to us by beautiful books or articulate articles. Nor are they the cascading of connections and clicks as assorted bits of information leap together and join up. No, these lessons are ones which take a long time to learn and make us feel very embarrassed for a good while afterwards. They are not the creation of new knowledge, instead they are the destruction of misconceptions. This week my misconception was the necessity of updates.

It doesn’t exist. Updates are a swindle and a lie. If a system is working, don’t change it. Don’t, for example, command all your nodes to update their most vital piece of software when there is absolutely no need for it. I really recommend that if you think that your machines do need some shiny new software, please find a good reason for updating it, and then make sure you test it. Please note that neither shiny or new are good reasons for updating software.

I updated docker to 1:1.7.0-1. This docker version doesn’t allow you to run containers on arm architectures. It’s a pretty big set back. After I realised that the guys at Arch Linux don’t archive previous software versions, and then taking a few moments to deal with this, I spent a decent portion of Monday becoming familiar with the PKGBUILD process and achieving a working docker v1.6.

A fixed docker 1.7.1 was released the day after.

The rest of this week ended up being devoted to creating the first (a scoop! The first!) ARM docker Hadoop image and dockerfile, after I first picked up some knowledge on hadoop, and spent Wednesday at Jeremy’s memory management conference. There were lots of very smart people there, but I missed some of the more interesting talks I’d hoped to make. The speakers will hopefully upload their notes soon enough though. I’ve sometimes noticed that Lecturer’s seem to be disappointed by the depth they have to limit themselves to when teaching, but that upper limit didn’t exist here. I imagine that as a researcher it can sometimes feel like there are very few people who understand or appreciate what you are doing, and the gathering of like minds must be a breath of fresh air.

I’m not sure I’ll have such a luxury when I hope to present the Pi 2 cloud at Glasgow’s Explorathon in September. Nothing has been confirmed yet, but we hope to have a stand there.

I’ll leave you now with this preview of next week’s blog post.

bristol board

A tale of two towers

Behold! Our new testing tower for the Pi Cloud:

pi 2 cloud

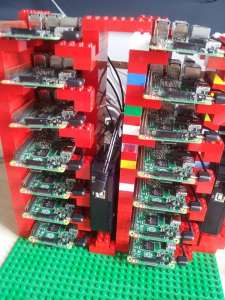
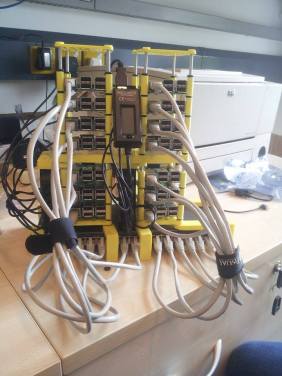
I’ve moved the Pis back to a lego rack of my own design. This was sadly necessary, as while Posco‘s 3d printed design looks great, and allows for much more airflow, its compact nature made hot swapping the Pis fiddly. The Lego design also allows easy access to a Pi’s HDMI port, making network trouble shooting just that little bit quicker. I’m sure I used to perform function over form when it came to Lego construction. I would ask myself, “does this spaceship have enough lasers?” The answer was usually no. However, I found the colour mixing on the right tower extremely vexing, and a shopping trip to a Lego shop might be in order. All very professional of course.

Building this Lego tower got me thinking about other designs, and now that the Pi 2 Cloud has its first show booked here at Glasgow University’s SOCS intern-fest, perhaps it’s time to start planning a remodel with something flashier. It’s also worth noting that we’re hoping to take the Pi 2 Cloud on a tour, so if you’ve any expos or shows coming up then please get in touch with us. In general I think we made good progress this week, but I this may only be in comparison to last week.

Kubernetes turned out to be something of a rabbit hole, as I’m not sure anyone has managed to follow the docker multi-node set up through on a Raspberry Pi 2 yet. We’re waiting for Google to get back to us with some help on this, but in the mean time falling back to Saltstack isn’t an awful compromise. I also had some difficulty with the Linux dd utility, which would work, but not quite, creating the correct partition tables on a blank SD card, filling them with the correct files, yet doing it in such a way that prevented booting. I worked around this by copying and pasting working boot files, but am no closer to figuring out what went wrong. Something somewhere corrupted, and as interested as I am in investigating this, I’m starting to gain a greater appreciation for what’s worth my time and what’s not (a dd operation taking 2 hours is not. Always remember to set block size!). Still, we have 14 Raspberry Pis in our cloud now, and next week I’m deploying a very cool distributed chess application to them and doing some benchmarking. I just hope numbering the Pis from 0 to 13 doesn’t prove unlucky!

Names and their meanings

“A rose by any other name would smell as sweet”. This is said by Juliet in Shakespeare’s most famous play, and she is perhaps half right. A rose does not smell like a rose only because it is called a rose. However, if a flower is named as a rose it is expected to behave like a rose, and smell as sweet. When an object is named we bestow upon it certain ideas and expectations, and this is all the more true for things which have been recently named. In this blog post I’ll be investigating why the components of our stack have the names they do.

Raspberry Pi

The reasoning of the naming of the Pi wasn’t very hard to dig up. It seems the dev team were nostalgic about old Home Micro PCs, and indeed wanted to build a successor to these, envisioning a platform which “like those old home computers, could boot into a programming environment”. A lot of these Home Micros had fruit based names, like Apricot, Tangerine and even Apple. The Raspberry part of this name seats the device comfortably into the computing tradition. The Pi part is perhaps less inspired, it comes from the simple fact that Python was the main language that people are expected to use and to learn on the Raspberry Pi. It’s a good name overall though, and makes clear where the Raspberry Pi comes from, and where it’s going.

Docker

To the best of my knowledge, this name comes from extending the metaphor of containers. In a particular “intro to docker” video I once watched, the speaker described the gap which docker fills with a shipping container metaphor. The speaker argues that before shipping containers were made, transporting goods was hard, as there was no standard around which shipping infrastructure could be built. In this context, the goods to be shipped is software, and the shipping containers become Linux Containers. Docker, like a dock, allows locals to easily deal with foreign products, by packaging these foreign products (or code) into a container where it is much easier to deal with.

Kubernetes

Originally a greek word, Kubernetes means ship’s helmsman, the last actor in navigating a ship. This is an interesting name as Plato used a ship of state in the republic, as a metaphor for the governance of a city-state. This classical allusion would make a software company any smaller seem pompous, but as it’s google we’ll have to let it slide. The name Kubernetes reflects the nature of the software as an orchestration tool, although it is much longer and rarer a name than is often encountered in software.

Saltstack

It seems that Salt is so named as an extension of it’s design philosophy, of being highly modular and extremely lightweight. Saltstack continues this theme with grains and pillars, and although it would be very interesting if Saltstack was in some way named for the biblical story of Lot’s wife turning into a pillar of salt, I think it is unlikely.


I can’t leave you without a progress update, so here is a picture of a 3d printed tower we’re testing for our friend Posco at the University of Liverpool


Posco's Pi tower!

Attrition

This week was a hard one. The cutting edge seems like a much more elegant concept when you’re far away from it, knowing that somewhere smart people are chipping away at the unknown. These wise philosophers use measured accuracy and precision, planning every move and quickly reaping the fruits of their intellectual labours. Now that I’ve joined them on this frontier, I can tell you that this is not how things are at all.

This not to say that all researchers are like myself of course, I’m sure all of them are much more capable, intellectual people than I, with fantastic methodology. Of course, this doesn’t mean that they never run up against problems either, and this week, I’ve had my fair share of them.

It started with Shipyard. Shipyard can be thought of as something of a poster child for docker. Simply download a container and then you instantly have a full docker cluster management suite, without ever having to deal with any of its nasty complexities. However, this is assuming that you are running docker on a 64-bit host. If you are on a raspberry pi, then you have to compile everything yourself from a minimal armv7 Ubuntu image, not just for the application container, but for the separate Rethinkdb container too, Shipyard’s data store. I managed to get shipyard working, but it’s Rethinkdb component is running into compilation errors despite it’s supposed arm support. I struggled against this for a while, but rather than get bogged down and keep hitting my head against a brick wall, I decided to move onto Kubernetes.

Kuberenetes is a hotly anticipated management tool, developed by Google and used as part of their own internal Borg infrastructure. It handles the scheduling of a compute cluster using labels and pods, and is currently in pre-production beta. Unsurprisingly, the developers at Google haven’t yet made single board 32-bit micro computers one of their key targets yet, so compiling Kubernetes is bringing its own host of problems.

Two pieces of advice that I would give to anyone doing something like this is make sure you have at least a GB swapfile, and that you should be more than willing to try to fool the installer. Kubernetes required a golang:1.4 container to install, but as the default one is 64 bit, I instead downloaded and renamed a Raspberry Pi 2 targeted one.

This week has taught me that I have a daunting path ahead of me, one that has been trodden by few others (I found one guy on twitter but he didn’t document ANYTHING). I am not going to give up. Far from it, now I better appreciate the scale of this challenge ahead of me. All these in-alpha orchestration programs have reminded me just how important the education and research that this platform will provide will be. I cannot wait to dive back into the project in a weeks time.

End on a bright note, look at my new mug. See you next time.

It's official now!

It’s official now!

PROGRESS

We have chosen a distribution!

Raspbian was the first to fall, it’s lack of an armv7 targeted derivative leading to concerns about its performance. Next was Debian armhf, for which I’d had big hopes. Unfortunately configuring Debian for Docker was taking too long, and we had to move on. Next down was Ubuntu Mate for the Pi 2, which is honestly an excellent distribution, but just wasn’t right for us. Ubuntu Mate installed docker perfectly well, but came with too many apps we didn’t need and was worryingly specific compared to Arch Linux Arm. Arch suited our requirements perfectly. Docker installed without a hitch, and Arch has a large enough community to ensure that the distribution will continue to be supported for a long time.

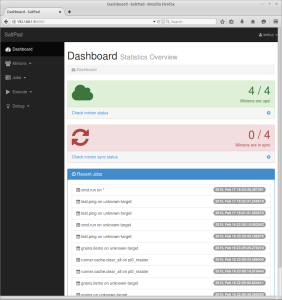
With our operating system chosen, it was time to start building up our stack. We needed a tool to administer our small dev group of Pi’s for, which could be easily extended to five times the number of machines. The tool would have to be lightweight, scalable, easy to learn and fully featured. For this reason we went with Saltstack. Saltstack has everything we need. It’s FOSS, and powerful. I can send commands to every machine in just one line, it has a server/agent (salt-master/minion) relationship built in, and it supports docker. It even comes with an API, and after a little bit of fiddling I was able to get SaltPad, a web based GUI for Salt, up and running on pi0, which also hosts the Saltmaster.

Screenshot from 2015-06-12 13:13:13

SaltPad is a promising project, but it’s still in early alpha and as buggy as you might expect. It’s also missing some critical features for us. It’s very worthy regardless, and I might try toying with this alongside shipyard, the free docker management tool, seeing how effective the combination is, and if our Pi master can handle it. If nothing out there ends up working for us, then we’ll have to build our own solution. Just in case that does end up happening, let us know in the comments the features that you think all cloud management software should have.