Raspberry Pi Lego Rack Designs

A few people requested that we describe the design of our racks.

The truth is, each rack is slightly different and the final build is not the one we’d planned. A couple of reasons for this: we didn’t quite receive the Lego pieces we were expecting, and we had to tweak the designs to make things fit better. So this is a somewhat retrospective design document…

We have four racks containing 14 Raspberry Pi’s each, actually composed of two adjacent towers. In between the towers are two USB hubs. The design is such that the front provides access to the SD card slot and micro-USB power supply, so we can easily change SD cards and reset the Pi’s. We can also slide the Pi’s out, which is incredibly useful as we tend to be cannibalising Pi’s quite often, or else swapping them around for testing. The back of the racks has space to reach the ethernet port, and each rack has a dedicated Netgear GS116E switch.

Each rack sits on a green 32 by 32 stud (25cm x 25cm) Lego baseplate.

Ten studs worth of space is left in front of the rack, and eight studs at the back. There’s a gap of two studs either side of the rack.

For the most part, the towers follow four simple layers of Lego, corresponding to a snug fit for a single Raspberry Pi. The only exceptions to these layers are (a) connecting structs between the two towers to hold them together and (b) the top of the racks, which are frankly all of differing design depending on the academic or student that built them! Particularly as the available Lego ran out, the designs became more improvised. So here I’ll just show the three layers that make up the towers and a few examples of the improvisations people chose.

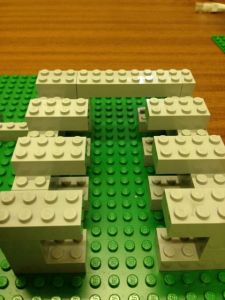
For the first layer, we use 2×4 Lego bricks to create “feet” that protrude into the space for the Pi. The Pi actually sits on these feet, to give it space below for the SD card and to allow airflow underneath the Pi’s (the extra piece in the centre is to keep the USB hub in place):

IMG_2258

Next, we simply add two layers of Lego that do not overlap the feet, just building the perimeter wall with enough room for the Pi:

IMG_2262

Here’s a few horizontal shots to clarify:

IMG_2264 IMG_2263

The fourth layer is more or less the same as the first layer, but we add a long strut at the back instead of the two 2×4 lego pieces we had, to strengthen the structure:

IMG_2265

shots from the side and the back:

IMG_2266

IMG_2270

Now we simply repeat the second, third and fourth layers on top of this, until we eventually have enough room for seven Pi’s in each tower. Just a couple of exceptions:

Struts are added an intervals in the rack to strengthen the towers. For example, see the one halfway up the red tower in the image below:

The tops of the racks are a little improvised. Here’s one example:

IMG_2272 IMG_2271

Creating an LXC Container on the Raspberry Pi

This post assumes you’ve followed the instructions in our post “Building an LXC-friendly Kernel on the Raspberry Pi” to get kernel support working and install the lxc tools from the LXC git repository.

Mount a cgroup

# pico /etc/fstab

# add the line “lxc /sys/fs/cgroup cgroup defaults 0 0”

# mount -a

Create a Directory to Store Hosts

# mkdir -p /var/lxc/guests

Create a File System for the Container

Let’s create a container called “test”.

First, create a filesystem for the container. This may take some time

# apt-get install debootstrap

# mkdir -p /var/lxc/guests/test

# debootstrap wheezy /var/lxc/guests/test/fs/ http://archive.raspbian.org/raspbian

Modify the Container’s File System

# chroot /var/lxc/guests/test/fs/

Change the root password.

# passwd

Change the hostname as you wish.

# pico /etc/hostname

undo chroot

# exit

Create a Minimal Configuration File

# pico /var/lxc/guests/test/config

Enter the following:

lxc.utsname = test

lxc.tty = 2

lxc.rootfs = /var/lxc/guests/test/fs

Create the Container

lxc-create -f /var/lxc/guests/test/config -n test

Test the Container

# lxc-start -n test -d

[wait for a while, a few minutes]

# lxc-console -n test -t 1

Building an LXC-friendly Kernel for the Raspberry Pi

This post is heavily based on Yohei Kuga’s post on Google+

https://plus.google.com/113091037050058478853/posts/8tYdBrbxu8i

We’ve spent a lot of time installing LXC in various ways and using different configurations. Recently Yohei Kuga posted a neat and minimal process, which was certainly more streamlined than our approach. I’ve expanded his notes and tested everything to ensure it works.

Download Raspbian and bake an SD Card

See:

http://www.raspberrypi.org/downloads

We used the 2013-02-09-wheezy-raspbian.zip image.

We made no other changes to this image other than those instructions listed below.

Switch to Root User on the Pi

These commands must be run as root. You can use “su”, or for convenience (I know):

# sudo su root

Expand to fill SD Card

Expand to fill SD card and reboot after entering:

# raspi-config

Update Raspbian

# apt-get update

# apt-get dist-upgrade

Install git

# sudo apt-get install git-core

Update Firmware

The clone will take a while. You might consider cloning on a desktop machine to save time. Just transfer the firmware/boot and modules/ directories from your desktop PC to the Pi after the checkout.

# cd /opt

# git clone git://github.com/raspberrypi/firmware.git

# cd firmware/boot

# cp * /boot

# cd ../modules

# cp -r * /lib/modules

# reboot

Increase the Swap File Size

I found that in order to check out the source on the Pi, you’ll need a swap file with the 256MB Pi, otherwise it will run out of RAM during the checkout (with fatal: index-pack failed).

# pico /etc/dphys-swapfile

# change to 500 (MB)

# sudo dphys-swapfile setup

# reboot

Prepare to Build Kernel

The clone will take a while. Again, you may consider using a desktop PC. Of course, if you do that, you’ll need to issue the “zcat” command from your Pi and copy the resulting “.config” file to the “linux” directory on your desktop PC.

# cd /opt

# mkdir raspberrypi

# cd raspberrypi

# git clone git://github.com/raspberrypi/linux.git

# cd linux

# zcat /proc/config.gz > .config

Decrease the Swap Space File

# pico /etc/dphys-swapfile

# change to 100 (MB)

# dphys-swapfile setup

# reboot

Install Packages for Kernel Compilation

# apt-get install ncurses-dev

Kernel Options

You’ll now need to set some kernel options to support LXC, via the menu config tool.

# cd /opt/raspberrypi/linx

# make menuconfig

You need to enable these options:

* General -> Control Group Support -> Memory Resource Controller for Control Groups (*and its three child options*)

(this has high overhead;only enable if you really need it, or else enable and remember to disable using the Kernel command line option “cgroup_disable=memory”)

* General -> Control Group Support -> cpuset support

* Device Drivers -> Character Devices -> Support multiple instances of devpts

* Device Drivers -> Network Device Support -> Virtual ethernet pair device

Build Kernel 

# make

# make modules_install

# cd /opt/raspberrypi

# git clone git://github.com/raspberrypi/tools.git

# cd tools/mkimage

# python ./imagetool-uncompressed.py /opt/raspberrypi/linux/arch/arm/boot/Image

# cp /boot/kernel.img /boot/kernel-old.img

# cp kernel.img /boot/

# reboot

Download Latest LXC

The LXC tools provided with Raspbian are out-of-date.

# mkdir /opt/lxc

# cd /opt/lxc

# git clone https://github.com/lxc/lxc.git

# apt-get install automake libcap-dev

# cd lxc

# ./autogen.sh && ./configure && make && make install

Testing the Install

Check LXC is happy with your kernel:

# lxc-checkconfig

User namespace should be “missing” (it checks for a kernel option that no longer exists) and Cgroup namespace should say “required”.

Photos from Demofest

A few photos from our recent outing to the SICSA Demofest in Edinburgh.

Building a Raspberry Pi Cloud

First post! I suppose I had better explain where we’re up to.

We’re now four months into the Raspberry Pi Cloud project here at Glasgow, and I have to say it’s going pretty well. In addition to our original team (myself, Posco Tso, Jeremy Singer and Dimirios Pezaros), we have added summer intern Robbie Simpson, volunteer Rene Weber, and three project students: Richard Cziva, Alan Reid, and Colin Boyd.

Robbie was one of our final year students and is now working on a PhD here at Glasgow. Rene recently spent a few months working here on a related project on Cloud Networking and, despite returning to Germany, missed it so much here that he’s now contributing remotely to the project. Rene is currently working on software management and deployment, as well as the development of an AWS-style API for the cloud. Robbie took care of the initial overall design, construction and hacking necessary to get everything working.

We worked our way through several prototypes, and have now constructed four “racks”, composed of four colour Lego towers. Each stack contains two towers of seven Pi’s. Each Pi runs Debian Wheezy (a modified version of the excellent and life-saving Raspbian distribution), with a single USB hub and network switch providing power and connectivity respectively. For ‘virtualisation’ we’re using LXC containers, with some script hacking in Bash and Python to hold everything together. It really is quite primitive at the moment, but it’s a pleasure to see everything slowly taking shape.

David