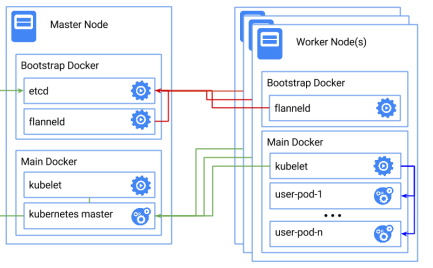
Google’s Kubernetes is a powerful orchestration tool for containerised applications across multiple hosts. We achieved the first fully running implementation of Kubernetes on Raspberry Pi 2 today, and thanks to the ease of docker, you can too.
You will need:
At least 2 Raspberry Pi 2s
Two SD cards loaded with Arch Linux | ARM
First, we need to install docker and ntpd on all the machines (the Pis need to have the correct time to download docker images):
pacman -S Docker ntpd
Just hit y to continue. I recommend that you reboot your Pis after this so that both services come up cleanly. Now we need to create a setup implementing this:
Select a Pi to be Pi master, and ssh in. I recommend that you to su root for the following. Then run the this command to bring up docker-bootstrap.
sh -c 'docker -d -H unix:///var/run/docker-bootstrap.sock -p /var/run/docker-bootstrap.pid --iptables=false --ip-masq=false --bridge=none --graph=/var/lib/docker-bootstrap 2> /var/log/docker-bootstrap.log 1> /dev/null &'
Then we need to bring up etcd, the key value store used by Kubernetes. This command and any other docker run command with a new container might take a little while when first running, as docker will need to download the container. I’m working on shrinking the images to make this less of a pain.
docker -H unix:///var/run/docker-bootstrap.sock run --net=host -d andrewpsuedonym/etcd:2.1.1 /bin/etcd --addr=127.0.0.1:4001 --bind-addr=0.0.0.0:4001 –data-dir=/var/etcd/data
Then we should reserve a CIDR range for flannel
docker -H unix:///var/run/docker-bootstrap.sock run --net=host andrewpsuedonym/etcd:2.1.1 etcdctl set /coreos.com/network/config '{ "Network": "10.1.0.0/16" }'
Now we need to stop docker so that we can reconfigure it to use flannel.
systemctl stop docker
Run flannel itself on docker-bootstrap. This command should print a long hash, which is the id of the container
docker -H unix:///var/run/docker-bootstrap.sock run -d --net=host --privileged -v /dev/net:/dev/net andrewpsuedonym/flanneld flanneld
Then we need to get its subnet information.
docker -H unix:///var/run/docker-bootstrap.sock exec <long-hash-from-above-here> cat /run/flannel/subnet.env
This should print out something like this
FLANNEL_SUBNET=10.1.78.1/24
FLANNEL_MTU=1472
FLANNEL_IPMASQ=false
Now we need to configure docker to use this subnet, which is very simple. All we need to do is edit the docker.service file.
nano /usr/lib/systemd/system/docker.service
Then change the line which starts with ExecStart to include the flags –bip and –mtu. It should end up looking something like this.
ExecStart=/usr/bin/docker –bip=FLANNEL_SUBNET –mtu=FLANNEL_MTU -d -H fd://
Now we need to take down the network bridge docker0.
/sbin/ifconfig
docker0 down
brctl delbr docker0
Then we can start Docker up again
systemctl start docker
Now it’s time to launch kubernetes!
This launches the master
docker run --net=host --privileged -d -v /sys:/sys:ro -v /var/run/docker.sock:/var/run/docker.sock  andrewpsuedonym/hyperkube hyperkube kubelet --api-servers=http://localhost:8080 --v=2 --address=0.0.0.0 --enable-server --hostname-override=127.0.0.1
--config=/etc/kubernetes/manifests-multi –pod-infra-container-image=andrewpsuedonym/pause
And then this launches the proxy
docker run -d --net=host --privileged andrewpsuedonym/hyperkube:v1.0.1 /hyperkube proxy --master=http://127.0.0.1:8080 --v=2
You should now have a functioning one node cluster. Download the kubectl binary from here, and then if you run
./kubectl get nodes
You should see your node appear. Now for the first worker node.
These instructions be applied as many times as necessary to gain however many worker nodes you need.
We’ll need a docker-bootstrap again for flannel.
sh -c 'docker -d -H unix:///var/run/docker-bootstrap.sock -p /var/run/docker-bootstrap.pid --iptables=false --ip-masq=false
--bridge=none --graph=/var/lib/docker-bootstrap 2>
/var/log/docker-bootstrap.log 1> /dev/null &'
Then we should stop docker
systemctl stop docker
And add flanneld. This node doesn’t need etcd running on it, because it will use the running etcd from the master node.
docker -H unix:///var/run/docker-bootstrap.sock run -d --net=host --privileged -v /dev/net:/dev/net andrewpsuedonym/flanneld flanneld –etcd-endpoints=http://MASTER_IP:4001
The master IP address is the IP address of the first node we set up. You can
check that you have the right ip by running
curl MASTER_IP:4001
You should get a 404 response.
As before, we need to get the subnet information.
docker -H unix:///var/run/docker-bootstrap.sock exec <long-hash-from-above-here> cat /run/flannel/subnet.env
and edit the /usr/lib/systemd/system/docker.service file to include –bip=FLANNEL_SUBNET –mtu=FLANNEL_MTU when launching docker, just like we did before
Now we bring down docker’s network bridge and reload it.
/sbin/ifconfig docker0 down
brctl delbr docker0
systemctl daemon-reload
systemctl start docker
This Pi is ready for kubernetes now
docker run --net=host -d -v /var/run/docker.sock:/var/run/docker.sock andrewpsuedonym/hyperkube hyperkube kubelet --api-servers=http://${MASTER_IP}:8080 --v=2 --address=0.0.0.0 --enable-server --hostname-override=$(hostname -i) –pod-infra-container-image=andrewpsuedonym/pause
docker run -d --net=host --privileged andrewpsuedonym/hyperkube hyperkube proxy --master=http://${MASTER_IP}:8080 –v=2
Running kubectl get nodes on the original Pi should now return both nodes.


